I have been coding since 2022. I am comfortable with backend and frontend, databases, and setting up servers. LLMs are now everywhere and I know nothing about it. So I want to try building something with it. This article will be a way for me to document my learnings and progress along the way.
What the hell is an LLM?

Nov 14, 2024
Today was the first day. I spend a long time talking with ChatGPT about what are LLMs and how to set them up on a server, or on my own computer.
I had heard that they come pre-trained but never really understood what that meant.
Then I learned that the best way to use LLMs is with Python, and not JavaScript. That's a good and a bad news. Bad news: I know less about Python. Good news: I am gonna learn. Digging a little more into that, I realized that I will need to build two backends. A node JS one that will act as my middle wear and connection to my DB. Then I'll have a python backend that will handle everything related to the LLM work. All this will communicate with APIs to my frontend, i'll use react for that.
After further research, I landed on Ollama and Hugging Face. Created an account on both tools and explored. They both look like powerful tools combined with a community. I don't fully understand yet what these tools really do.
Trying Ollama was really fun. I downloaded the lightest version of LLama 3 onto my computer. And using the command line interface, I was able to converse with the AI while my wifi was off. This was an incredible experience. I asked a ton of questions and the answers were very good.
This brought me to Youtube where I watched a couple tutorials on how to set up an LLM without Ollama on your own desktop and how to use a python env to communciate with it.
Something that is now on my mind is, what is the tool that I will be building. I need something easy to build but I am also looking for a coding challenge that will teach me something. Most importantly, I need to build something useful to a group of people.
Installed Llama 3.2 and got an answer

Nov 19, 2024
This weekend, I set up Llama 3.2 on my machine to avoid relying on third-party apps like Ollama. After creating a Python virtual environment and testing basic scripts, I initially downloaded Llama 3.1 8B from the official website (8B only, because I want to be able to test things fast).
However, converting the model weights for Hugging Face compatibility was tedious.
This led me to learn that I could download Llama from Hugging Face directly and it would already be compatible with all the great tooling that HF has created. I discovered that Hugging Face already provides pre-configured models. HF "provides pre-configured models ready for immediate use with their transformers python library. This saves time, eliminates manual conversions, and ensures compatibility with their robust tools for tokenization, inference, and optimization."
So I deleted everything and started over to switch to the Hugging Face version, installed their CLI tool, and downloaded Llama 3.2. My test script worked perfectly, generating an answer to the prompt: "Explain the basics of UX design."
from transformers import AutoTokenizer, AutoModelForCausalLM
def load_model(model_path):
print("Loading model...")
tokenizer = AutoTokenizer.from_pretrained(model_path)
model = AutoModelForCausalLM.from_pretrained(model_path)
return tokenizer, model
def generate_response(prompt, tokenizer, model):
inputs = tokenizer(prompt, return_tensors="pt")
output = model.generate(**inputs)
return tokenizer.decode(output[0], skip_special_tokens=True)
model_path = "my/own/path/to/my/llama_model"
tokenizer, model = load_model(model_path)
prompt = "Explain the basics of UX design."
print("Prompt:", prompt)
response = generate_response(prompt, tokenizer, model)
print("Response:", response)
Next steps: The model works, but response times are slow. I plan to optimize performance and build a simple front-end interface to streamline interaction. HF tools should make these improvements more manageable.
Built the frontend with React
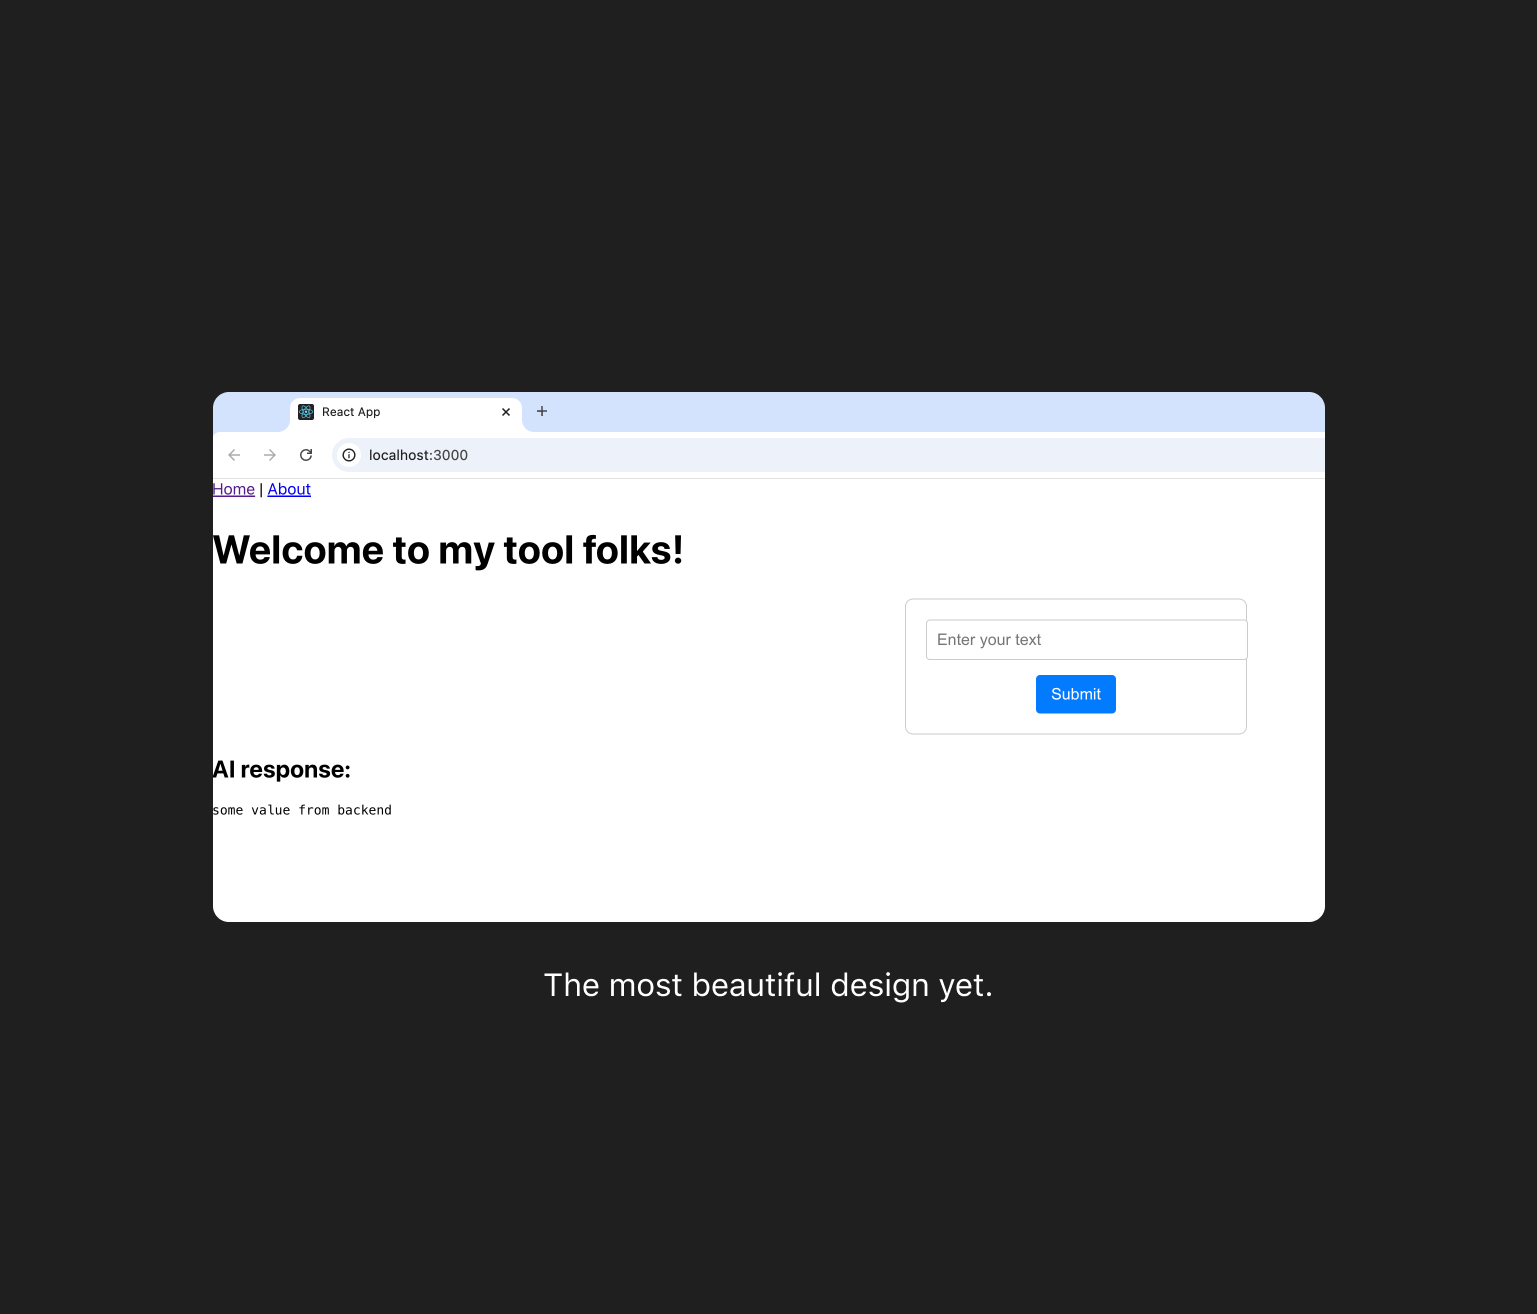
Nov 20, 2024
This got to be my most beautiful design yet.
Yesterday and today, I am create a React frontend app so that I can start playing around with the AI in a easier way. The reason is, I am still new to the terminal and how to navigate commands, so testing Llama using the terminal is not really efficient for me. Another good reason is that I want to get better at front end and my final app with need a UI anyway.
There are so many more steps to "building a front end" that I originally thought. Installing React is easy, you just type npm install -g create-react-app. But that only installs the very basic things. I then added a router system so that I can go to different parts of my app by typing different URLs. Now, / is home and /about is a different React components.
After that, I started to build a list of different React components so that my code is more easily maintainable. For examples, the navigation, form, and the AI response, are all different "React Components", meaning, they all live in different files. After than, I installed SCSS, a version of CSS that makes CSS classes easier to manage. This part of the work was fun, very visual, so quite similar to what I am used to as a designer.
But then I needed to build a reliable state management system. That was a different story. Much more "tech" than what I am used to. I installed React Redux and created the necessary files for it to be set up properly: store, slices, etc. The purpose of having Redux on your react app is that you can more easily manage different data. Ex: I need to store the user question and then send that to the backend. And then get the backend answer, store that and then show it on the front end. All this data can be a mess to manage, that's what Redux solves. It sorts of manages and centralizes client information. (I think...)
Connected the frontend and backend
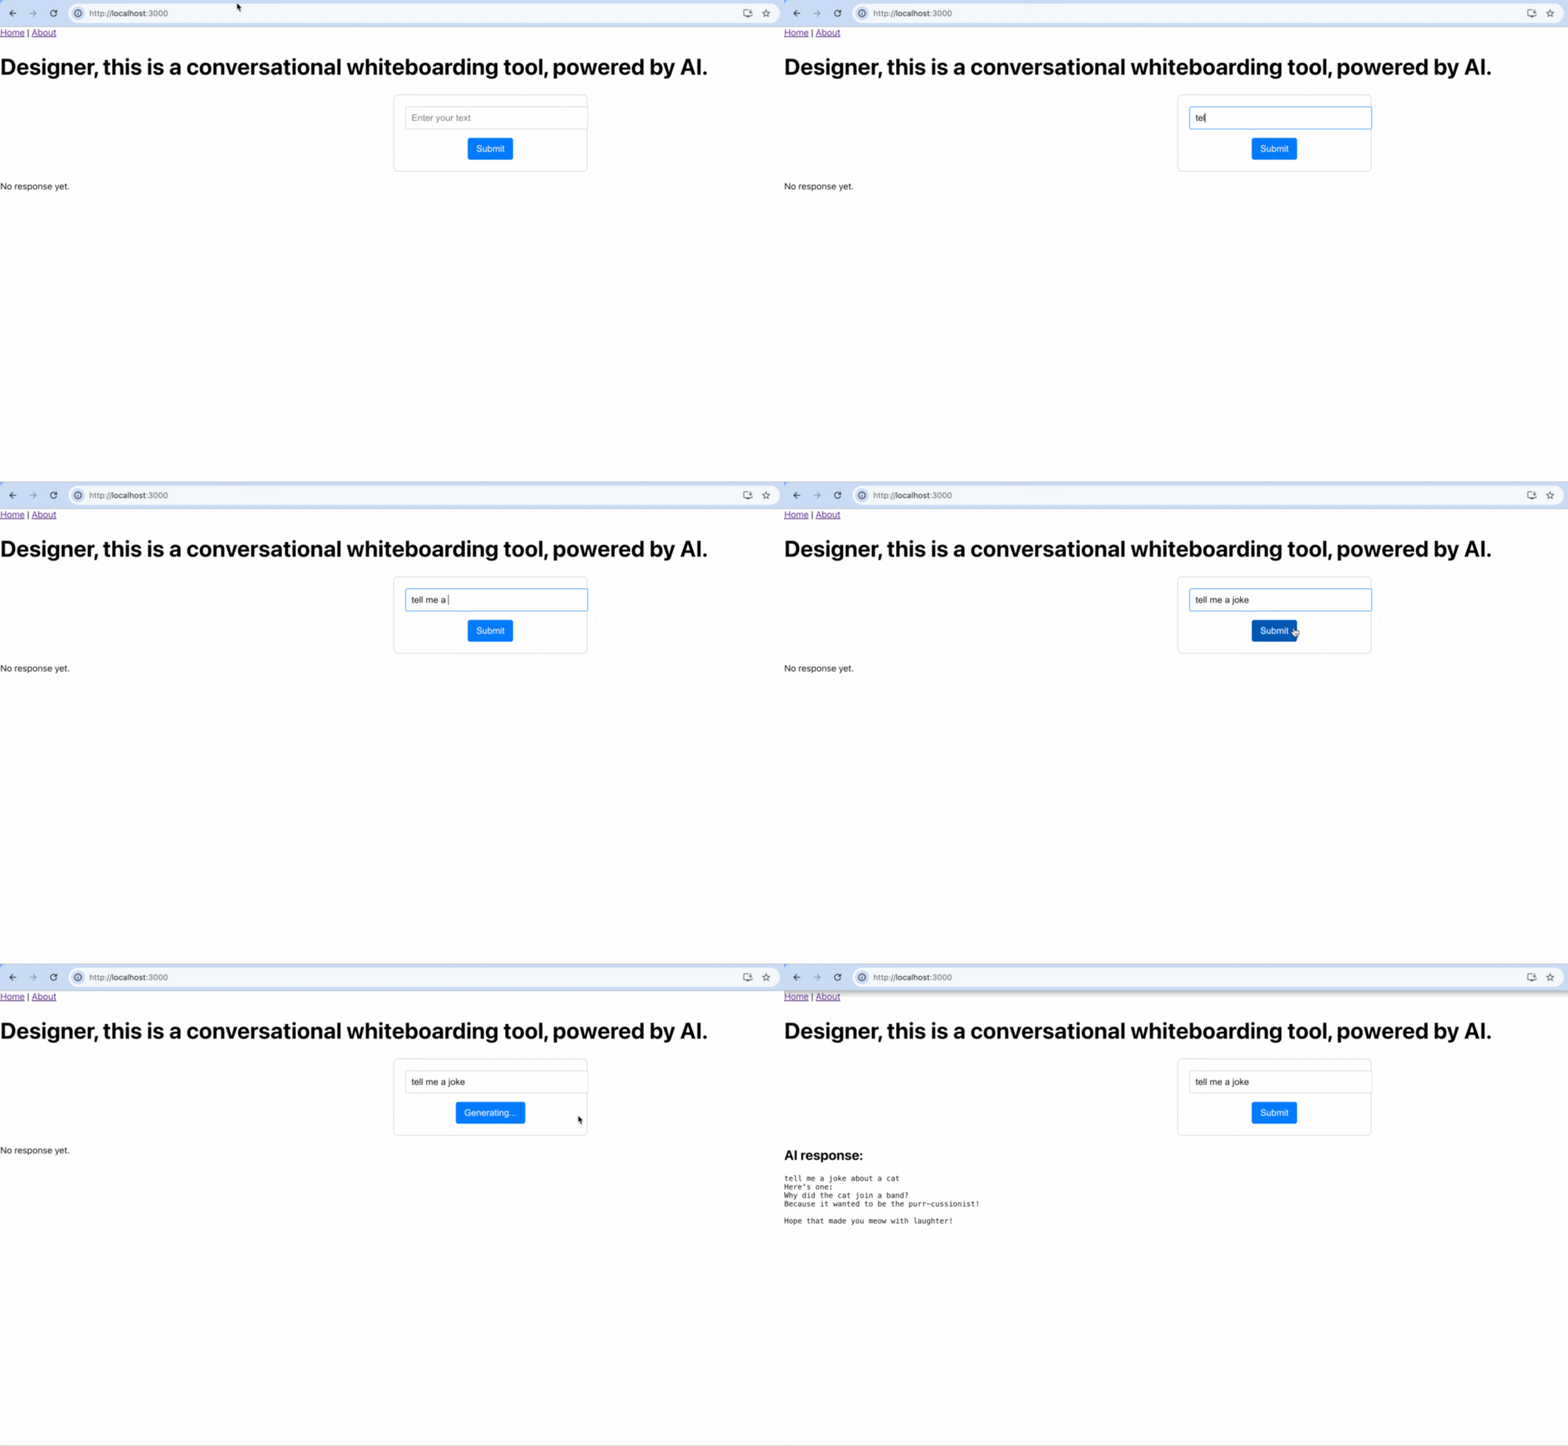
Nov 21, 2024
Success, I was able to connect the front end to the backend. This means that I am able to send the question (from the frontend) to the backend (Llama). The Backend then sends that to the LLM model, which loads, and then generates a response. The response is then sent back to the frontend and shown to the user.
In order to make this happened, I installed Flask on my backend python environment. Flask is a way to receive API calls from the frontend. Once I had that set up, I create a first file called generate.py, which houses all the code to handle this specific API call /generate.
I tried to follow this coding practice called "separation of concerns" as much as possible. This means that I created different files for different functions of my code. For example, I have a separate python file called llama_model.py that is housing the model loading function (you have to load a model and its tokenizer before being able to ask a question) and the response generation function (the actual function that takes a question and creates an answer using Llama).
Here is the generate file as an example.
# Define a route for handling POST requests to "/generate".
@generate_bp.route("/generate", methods=["POST"])
def generate():
# Access the tokenizer and model from the blueprint's attributes
tokenizer = generate_bp.tokenizer
model = generate_bp.model
# Extract JSON data from the incoming request.
data = request.json
# Get prompt field from request data. If not exist, use nothing.
prompt = data.get("prompt", "")
if not prompt:
# Return error message if no prompt provided
return jsonify({"error": "No prompt provided"}), 400
# Generate response using the provided prompt, tokenizer, model.
response = generate_response(prompt, tokenizer, model)
# Return the generated response as a JSON object.
return jsonify({"response": response})
I can already see interesting limitations that I will need to work on later. Each time I ask a new question, my code loads the model. So it makes it quite slow from a user's perspective. I also send the whole answer at once, instead of word by word. All of this will be solved soon, but not a priority right now.
In order to manage this latency in on the user side, I create a new state in the frontend application. Before, I only had either an answer, or no answer. There was no way for the user to see that the answer was coming. So I added a new element to my frontend to do that. In my slice (in the store), I created a new state called status: initialState: {...status: 'idle'}. This way, I can update this state and I can change the button copy to "Generating..." See the GIF above.
Then I saved all my work to Github, to be safe.
Now that I have a UI that can send a question to Llama and get an answer, I have reduced the risk in terms of feasibility. The next step will be to build an initial user flow on Figma to see how the proper first version of the tool will build.
User problems, flows, and UX

Nov 26, 2024
In the last couple of days, I worked on the product side of things. I have decided to focus on helping young designers practice for their white boarding interview.
I started by going back to my notes when I was applying for Meta. I built Whiteboarding templates and took a bunch of notes about what I should do, in what order, etc. I also Googled a lot of different aspects of this part of the design recruitment process. This step was a way for me to build empathy for my users. To take notes, I like to use Figma and make Post-its. As you see below, this led me to identify 4 main problem areas.

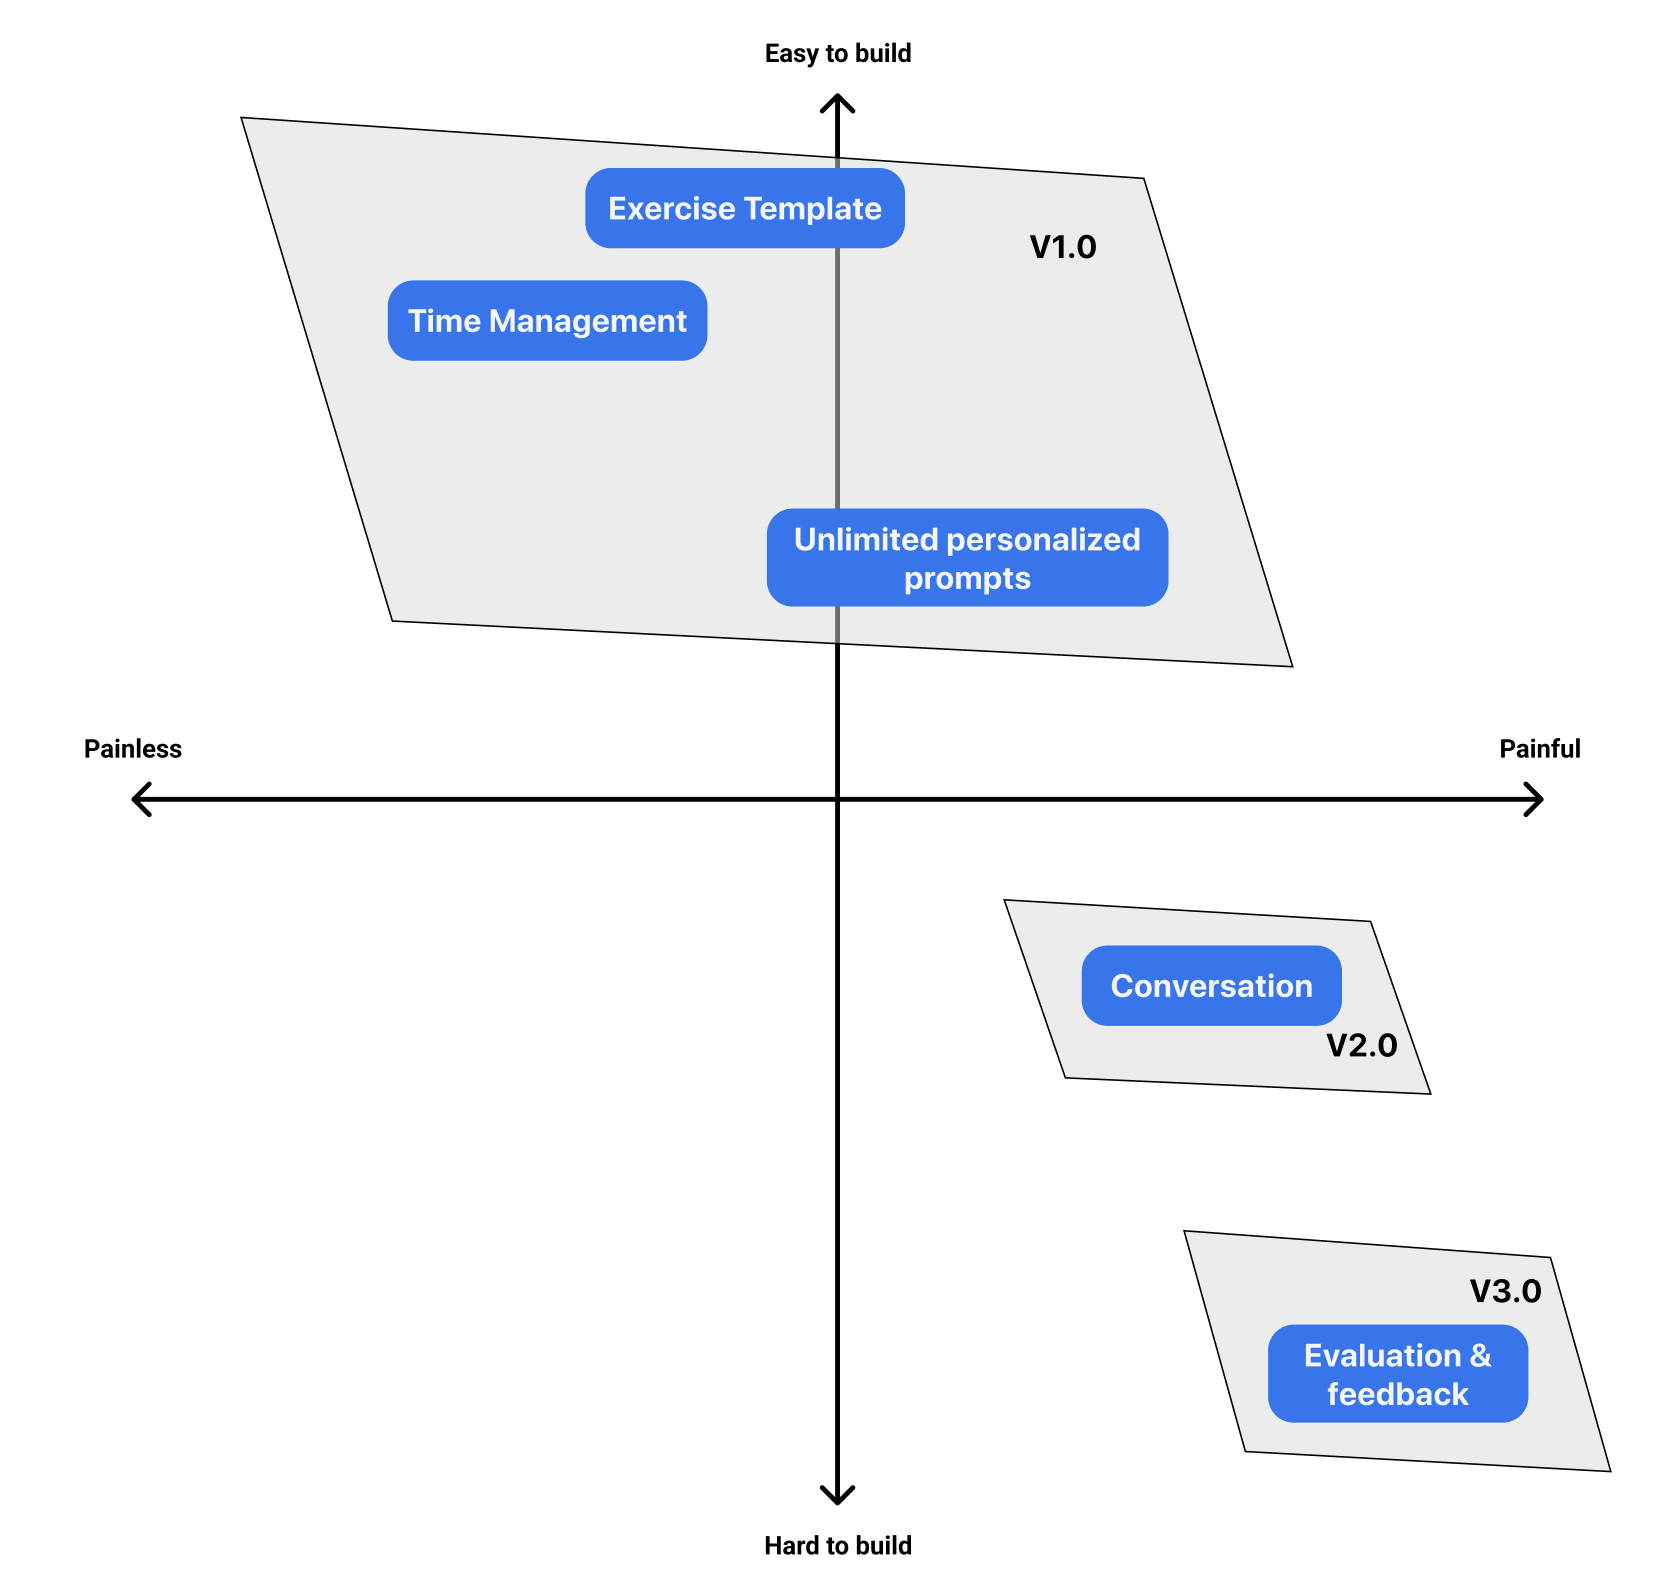
Then, I worked on turning this problem areas into possible solutions. and ranked the solutions by how painful their parent problem was and how hard it would be for me to build that feature. As you can see below, this sort of prioritization exercise helped me identify my V1, and later versions.
Now that I knew what features I needed to build, I went back into an exploratory mode with UI and UX research. I love this phase, I basically spend time looking at landing pages and UIs of products I love, I go on Behance and Dribbble looking for inspirations. My method is is quite messy.
Example of what goes on in my head during UI/UX research: "I will need a timer, what are the best websites that have used a timer in their UX for a long time?" - "Ok, Apple is an obvious good start" - "I could also look at some ed-tech companies that time their students during online exams" - "Maybe there are good promotional timers on landing pages" - "Ah, the last time I went on Opentable, there was a timer while I was booking a restaurant"
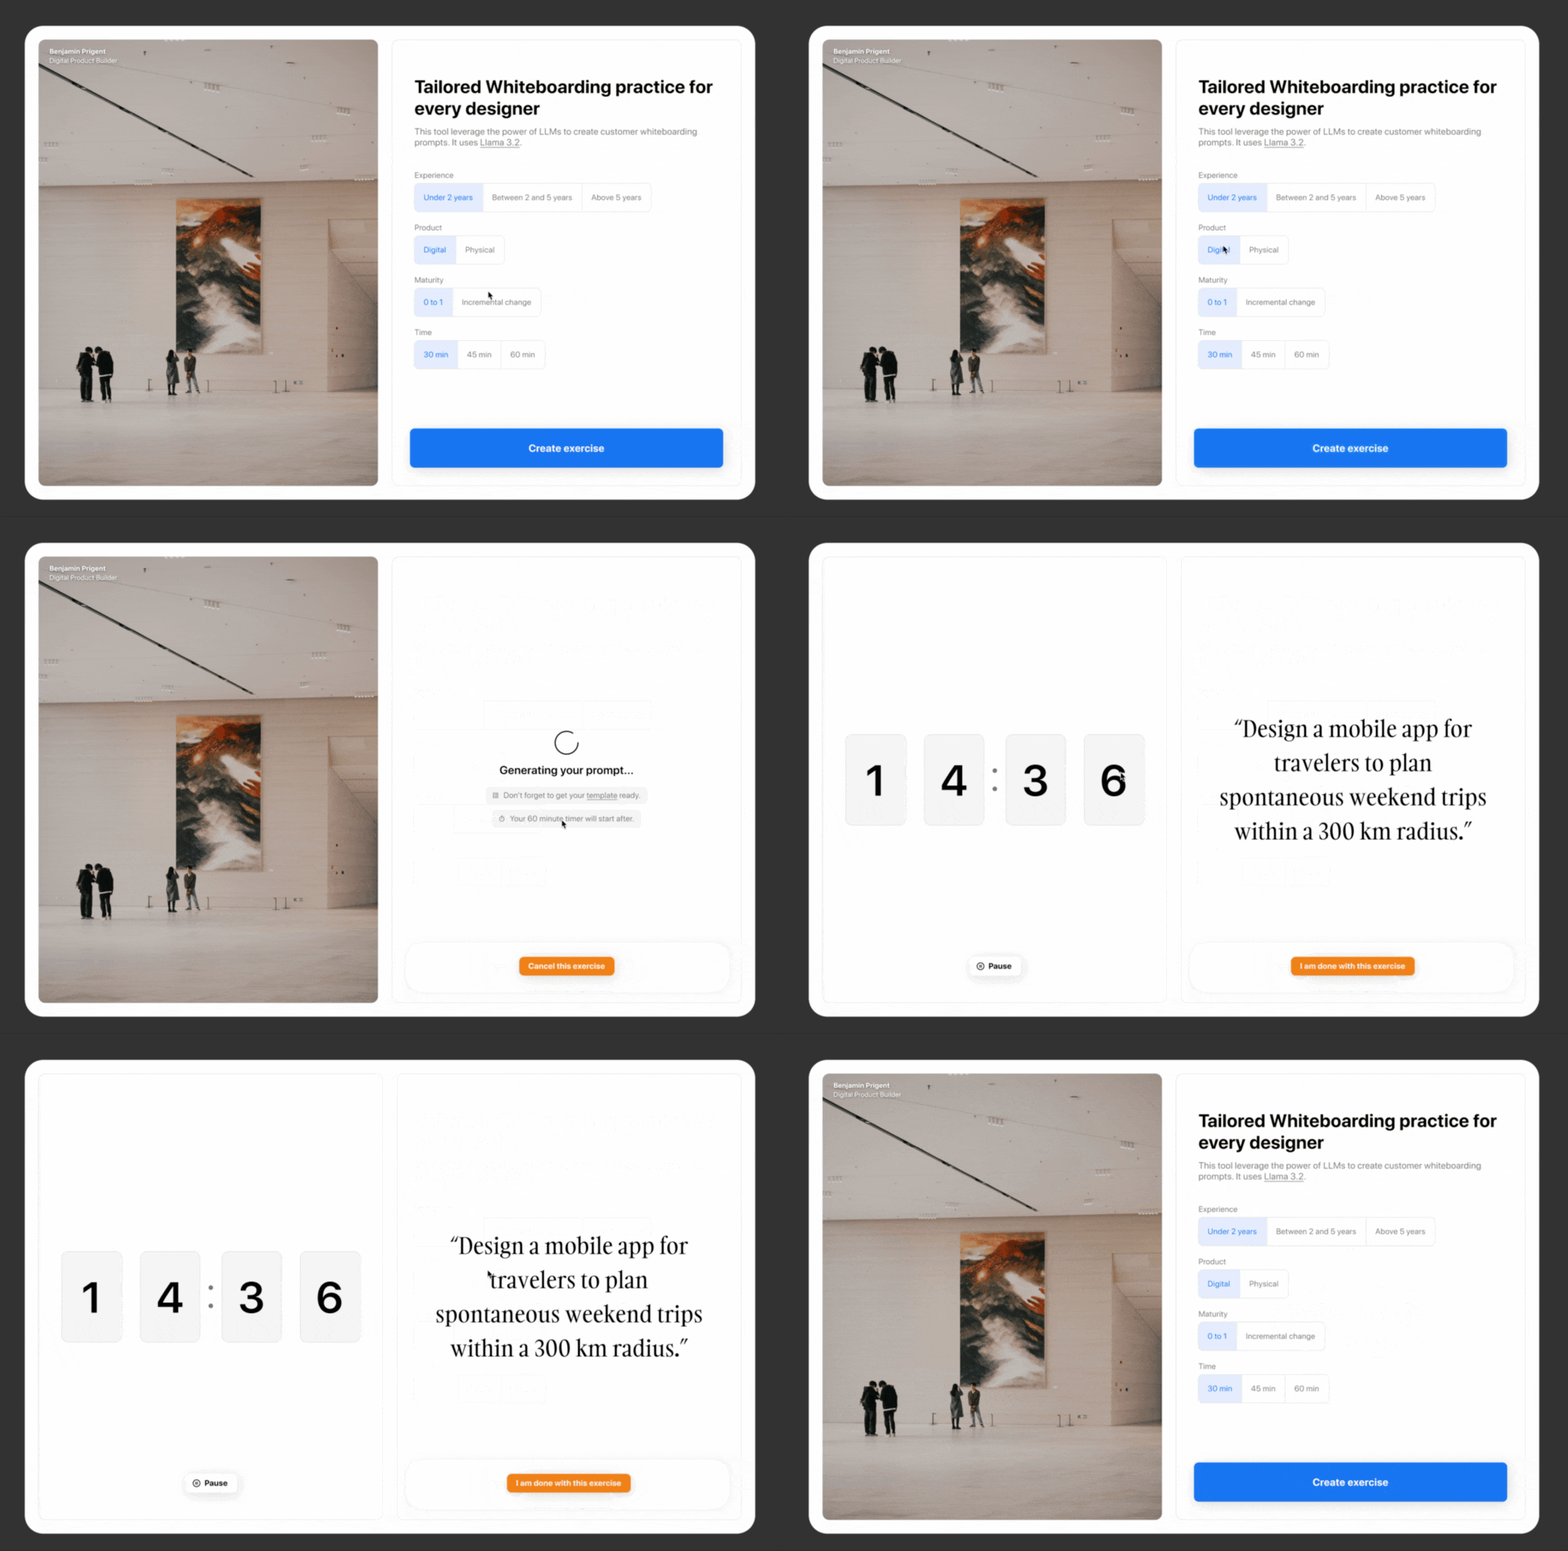
I took a bunch of screenshos, then I created user flows and low fidelity mocks and then generated this clickable prototypes for my V1.
Applying designs to the frontend

Nov 29, 2024
I started by auditing the different React frontend libraries. I wanted something easy to use and customize. I ended up downloading MUI, which looked like the industry standard alongside Bootstrap. MUI looked easier to use though.
In order to keep my own code manageable, I created a set of reusable components. First, I created a component called TowColPage. This component allowed me to have a responsive two column system, like you see in the Figma prototype above. I coded the component in such a way that I could place anything inside of each column. See the example code below and on Github.
// Form page
const FormPage = () => {
return (
<TwoColPage
leftContent={<Image/>}
rightContent={<Form/>}
/>
);
};
// Exercise page
const ExercisePage = () => {
return (
<TwoColPage
leftContent={<Timer/>}
rightContent={<ExerciseResult/>}
/>
);
};
The user flow of the product remains pretty simple. It all starts on /create-new. The user will fill the form and once it's submitted, they will be redirected to /exercise. Each page is using the same responsive system. But the Form page has a <Form/> and an <Image/> component. And the exercise page has the <Timer/> and the <ExerciseResult/> system.
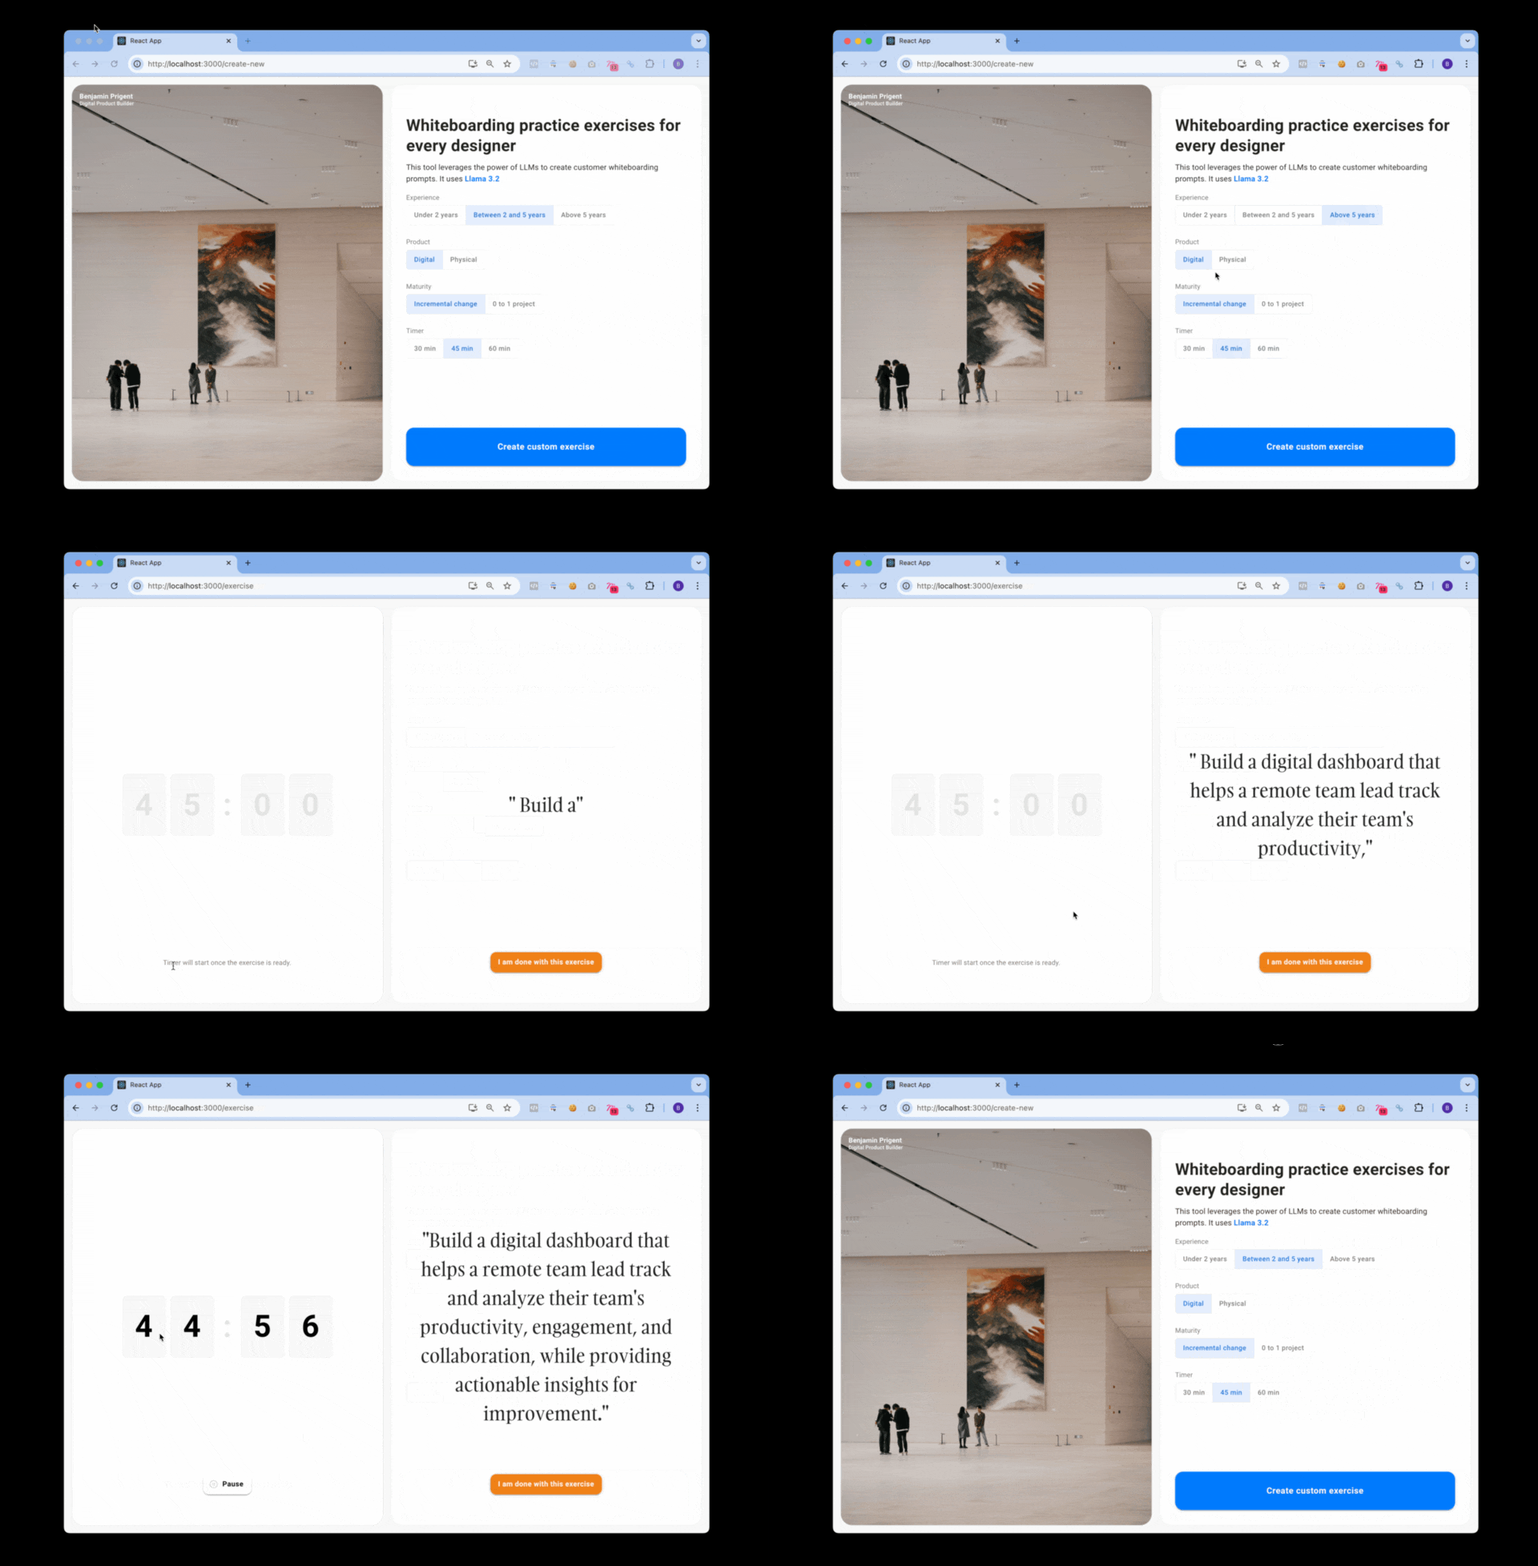
The 3 key components need to communicate each other's states. Example: the form needs to trigger the start of the AI prompt, and only when the prompt is done, can the timer starts. I do that with Redux and Slices. There is a timer slice that manages the current value, its decrement, it's state (paused or playing or over). There is a exercise slice that manages the prompt (updated with each new token added) and the status of the exercise. I have decided not to manage the form value with a slice for now.
Optimizing speed for prompt generation

Nov 30, 2024
It is weird to think that I have been working on this tool for about 2 weeks now. It feels a lot longer than that.
One thing I quickly noticed when testing different prompts to generate the best design exercises was the slowness of my LLM. It is still very slow, I am currently running at about 1 tps (token per second, the metric I have chosen to track model speed), but it is still a lot better than what I started with. In the last week, I spend ~2 days working exclusively on speed and wanted to document what I did.
1. Leveraging pre-tokenized caching
If the user fills the form with the same values, the same prompt will be sent to the AI for exercise generation. In this situation, you can pre-tokenize the prompt during initial processing and caching it. This ensures that repeated prompts do not do redundant tokenization, allowing the system to start generating tokens immediately.
To be sure that if the user wants a different prompt this time, the caching logic checks if the incoming prompt is different from the previously processed one, ensuring efficiency without sacrificing flexibility.
2. Streaming Responses Token-by-Token
This was the most work and also the most rewarding. Instead of waiting for the entire response to be generated, my tool streams each token to the user as soon as they are ready. This significantly improves the perceived speed, with the first token appearing almost instantly.
3. Using GPU instead of CPU
I also read online that using my GPU instead of my CPU was going to increase the speed at which the tokens were generated. So I updated my code to work with Metal Performance Shaders (MPS), available on my MacBook.
4. Key-value caching for incremental token generation
Key-value (KV) caching is enabled during token generation to avoid recalculating the attention layers for previously generated tokens. This optimization is critical for speeding up autoregressive generation, where each token depends on the ones generated before it. How it helps: Reduces redundant computations in the transformer’s attention mechanism. Speeds up token-by-token generation significantly.
5. Model and Tokenizer Caching
Before the tokens can be sent, you need to initialize the model and the tokenizer. I save a lot of initialization time by locally cashing these values. If they are already cached, subsequent loads fetch them directly from the disk. What does this mean for the user? It will increase their response time after the first exercise.
Version 2: Designing a chat interface

Dec 2, 2024
Now that we have a working coded prototype that will generate a design white boarding exercise prompt, I am ready to move to the next stage. That is, enabling the user to interact with the AI to ask questions, comment on the prompt, share ideas and concepts.
Design changes rational
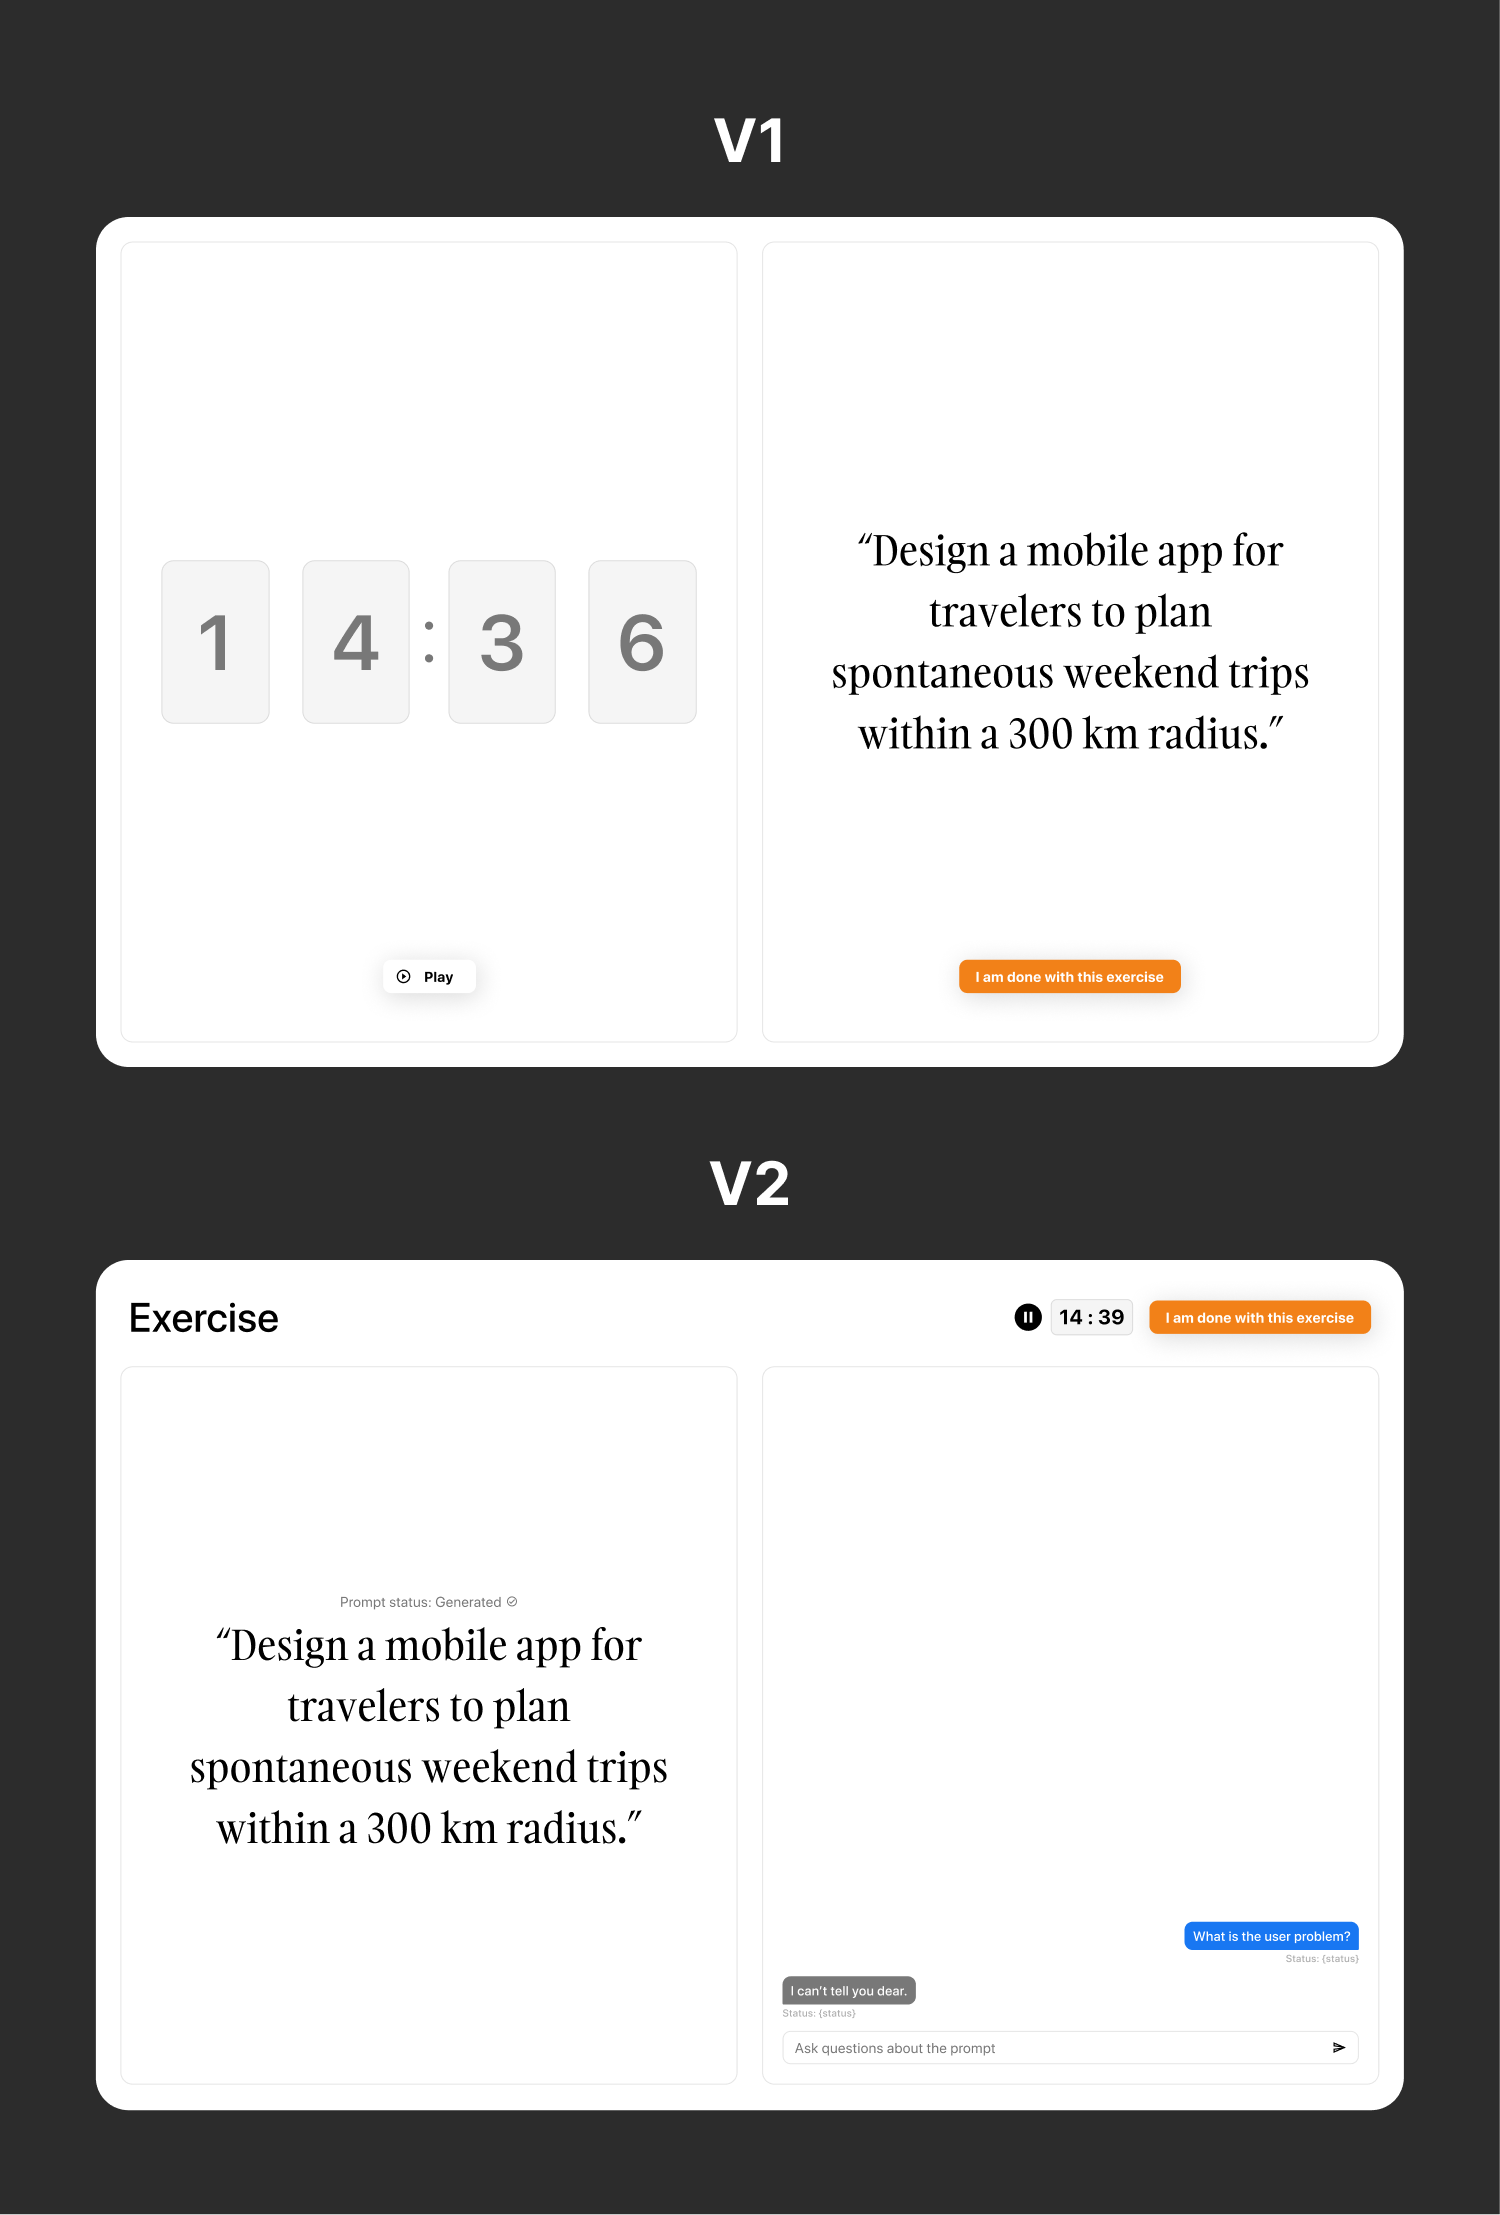
See the Figma designs below. From a 2 column system, I move to a grid with 3 sections: a header, and two columns. I moved the Cancel-CTA to the header and reduced the visual prominence of the timer and placed it in the header as well. I found that centralizing the exercise-level functions in the header made more sense and aligned with industry standards. So now, we have the exercise on the left and the chat interface on the right.
The header's name is just "Exercise" for now. Not the best. Maybe in the future I will name individual exercises - using something similar to what ChatGPT does for naming conversations. That would only come useful the day users can have more than one exercise, or save their past exercise for record keeping. Anyway, not urgent.
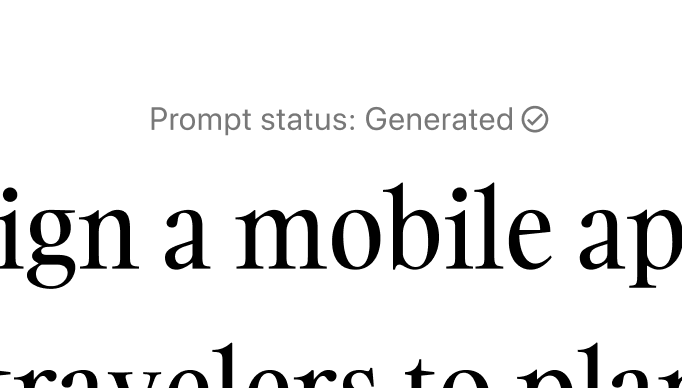
During my many tests, I noticed that it's not always clear to me if the exercise is done being generated. Even if the timer starts once the prompt is done, that did not really helped me understand the prompt status before. See below the zoomed in view of the status. There are only two possible, generating, and generated. I might even drop the "Prompt status:" at some point, à la Dustin Moskovitz.
What about the chat interface? There, I did not want to reinvent the wheel. We only have two possible members in the chat, so I don't need to indicate who is sending messages, the color and the alignment serve that purpose well enough. Then, the user needs to have a sense of status. On the user side, we have 2 status: Sending, and Received. On the AI side: Responding, and Sent. Another important thing will be to code "locked" status so that people can't start chatting before the prompt is done.

What the end goal here?
I want to end up with an Omni chat feature on the right panel (allow voice, text, and image communication) and run an analysis model on what is shared by the user in order to "grade" them and give them improvement tips. The progress, improvements and tips would appear on the left panel.
Version 2: Building it with React

Dec 5, 2024
I started the integration of V2 into React by creating a new layout component called TwoColAndHeaderPage.js. This component takes 3 props: a header, a right column and a left column.
I also has to create a new React component called Header.js, which took a smaller version of the timer and the Cancel-CTA. Creating the Header component was quick thanks to the Redux system I have in place. What do I mean by that? Because all timer functions and data (ex: start and stop timer, increment time, exercise status...) were stored globally in slices, I was able to quickly call these functions from my new header component.
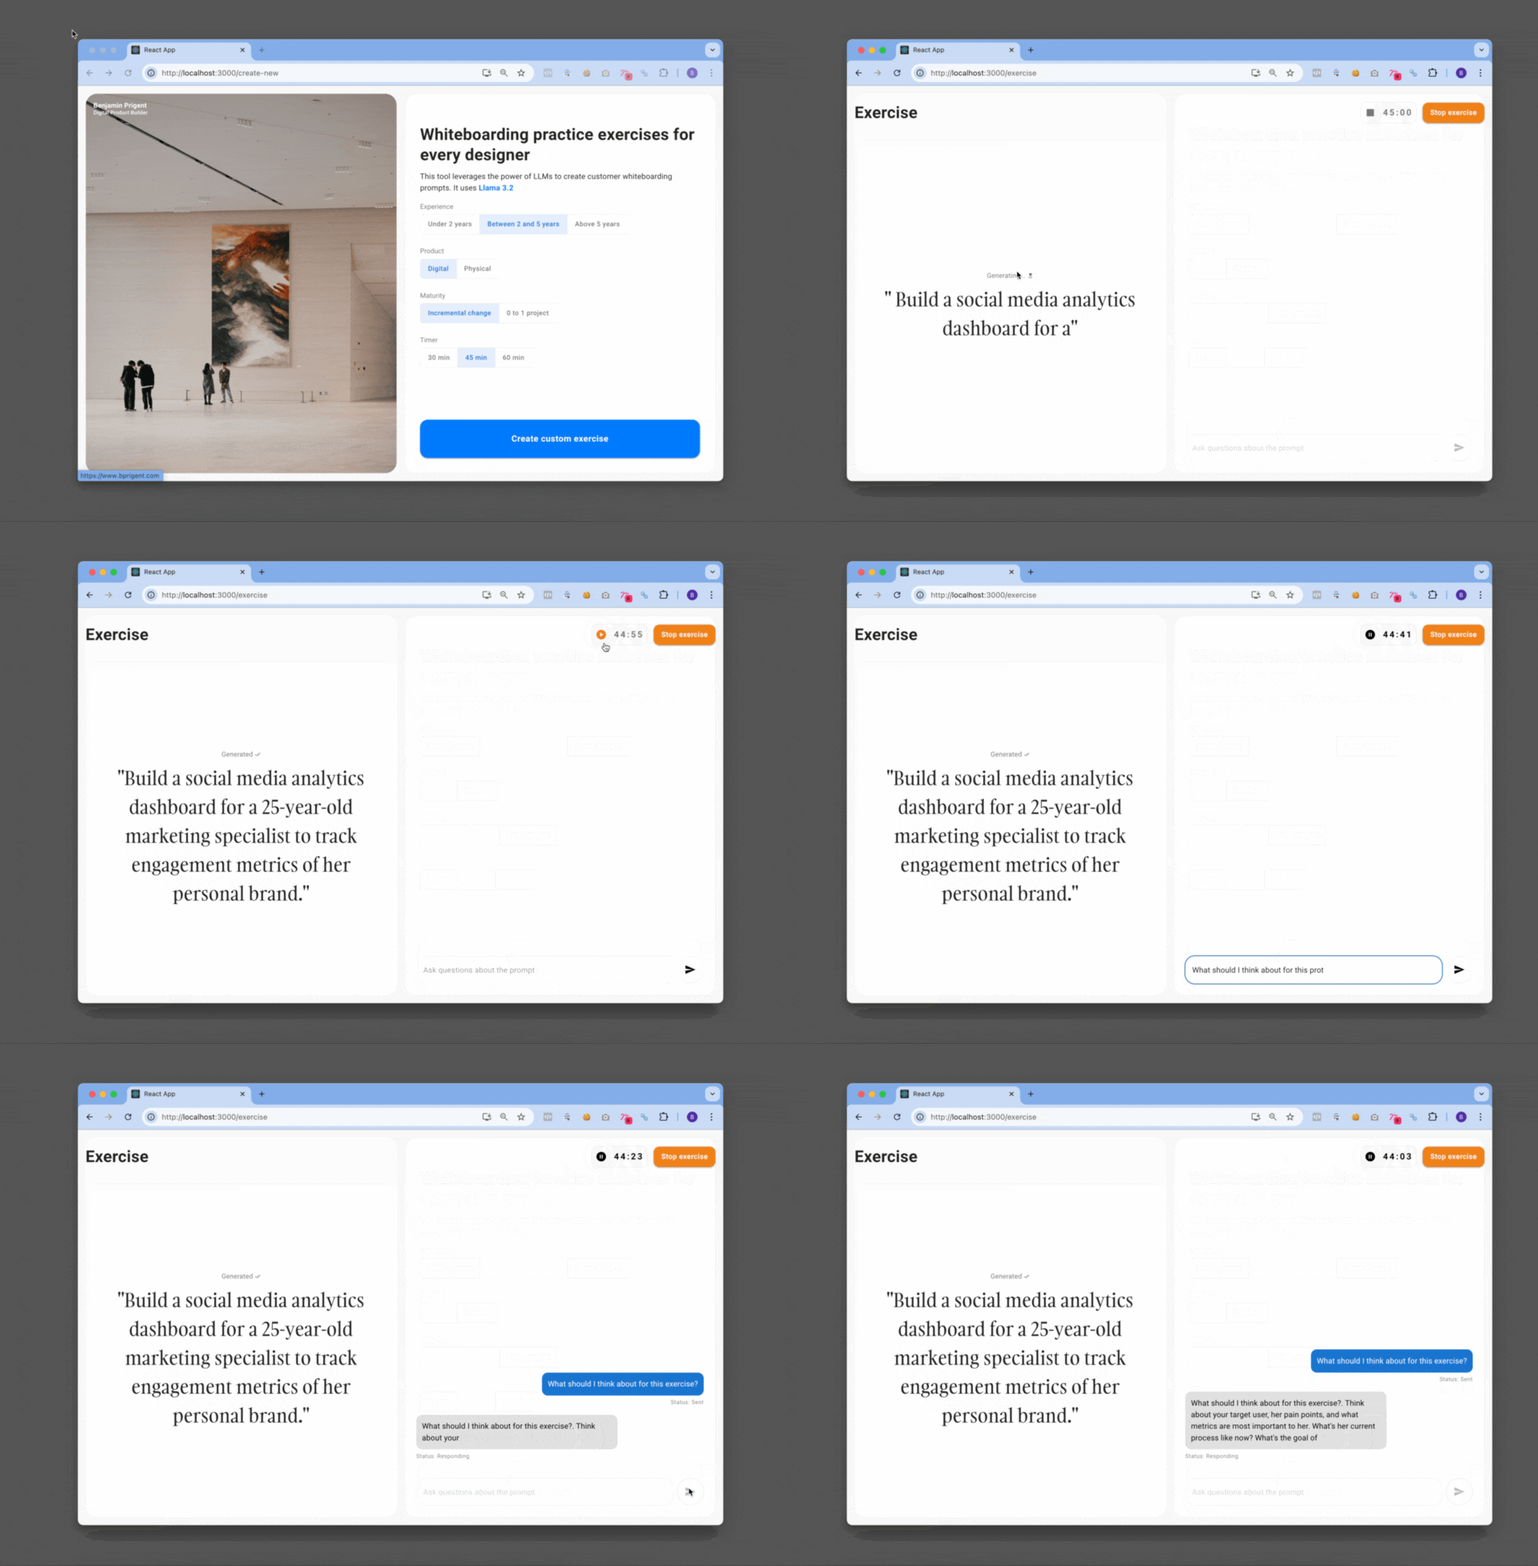
Then I created another component called TimerMini.js. This was a new version of the larger Timer.js so that it would fit in the header. Remember how large the timer was in V1?
After that, I edited ExerciseResult.js, the component that stores the prompt. I removed the Cancel-CTA and added the status system with the icon. During this edit, I also reworked the state logic of this component so that it would be easier to understand. I now have 5 states for the exercise:
exerciseStatus === 'warming': this means the model is loading and the prompt is being tokenized. At this point, no words appear because the AI is not ready for that yet. This stage can take up to 5-6 seconds. And I have no way to know WHEN it will end, so I am using an indeterminate loading wheel. Loading components come in built with Material UI.exerciseStatus === 'working': this means the AI has started sending tokens to the frontend. The UI can now show each new word incrementally. At this point, the timer is OFF.exerciseStatus === 'success': this means there is no more tokens coming. The timer stars and the chat system becomes active - people can send their questions and share thoughts.exerciseStatus === 'error': this is the default state for any error. There are many possible errors like lost internet connection, bug in the frontend when sending the request, bug when generating the response in the backend, etc.exerciseStatus === 'over': this is the state once the timer is done. The timer is now grey, the prompt hides, and the chat stops. In future version, this will be the state where I can show some results on how users did.
Until next time!
